3 Ocak 2013 Perşembe

278. Monitoring your office with a webcam and zoneminder on debian

To contact us Click HERE
Update: so this worked fine with my thinkpad sl410 camera, but I'm having a lot of trouble getting an image off of my usb Pixio cam (Z-Star Microelectronics Corp. USB 1.1 Webcam) with "Got signal 11 (Segmentation fault), crashing" and "'zmc -d /dev/video0' exited abnormally, exit status 11". Zoneminder feels annoyingly temperamental at times. Anyway, I ended up hacking together a poor but functional solution by using a shell script and streamer to save stills every few seconds, then letting zoneminder analyse and capture. Setting up two Airlink 101 AIC250W was remarkably easy though (although I remember having a lot of trouble in the past). I've also experimented with motion,  and although I'm having issues with the image colours it's working very well.

Original post
While I figured that the head of school might have a universal key allowing access to all the offices in the department (the cleaners do), finding out that he had used it to open my office for a trivial purpose has ticked me off.

While you may not have an expectation of privacy at your company office, I certainly do when it comes to my department office.

So I'm not too happy about that, and while monitoring my office will not prevent future breaches of privacy, it will at least ease some of the paranoia if it turns out that my office doesn't routinely get entered.

This post only deals with a locally attached webcam -- I struggled with remote wifi-connected webcams a few years ago with little luck.
sudo apt-get install zoneminder
sudo apt-get install v4l-conf v4l2ucpsudo cp /etc/zm/apache.conf /etc/apache2/sites-enabled/zm.confsudo service apache2 restart

Figure out what video devices you have:
ls /dev/video* 
/dev/video0
and make sure www-data can access them
sudo adduser www-data video

You can now navigate to http://localhost/zm
Click on 'add monitor'

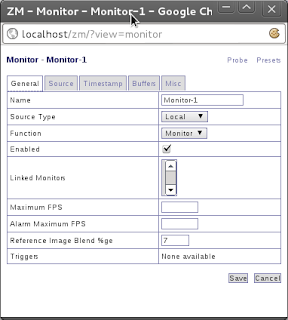
These settings are fine.

Note: these settings did NOT work. Keep reading the post...

Setting up the camera seemed deceptively easy -- everything went fine, except actually getting an image.

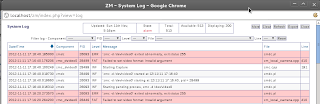
note the red colour for the video device. No good.

Looking at the log I was getting
Failed to set video format: Invalid argument
'zmc -d /dev/video0' exited abnormally, exit status 255


which is when I googled and found this post: http://rainbow.chard.org/2012/04/24/using-zoneminder-with-a-cheap-cctv-camera/

Basically, getting the settings absolutely right matters!
v4l-info

which told me
video capture    VIDIOC_ENUM_FMT(0,VIDEO_CAPTURE) index                   : 0 type                    : VIDEO_CAPTURE flags                   : 0 description             : "YUV 4:2:2 (YUYV)" pixelformat             : 0x56595559 [YUYV]    VIDIOC_ENUM_FMT(1,VIDEO_CAPTURE) index                   : 1 type                    : VIDEO_CAPTURE flags                   : 1 description             : "MJPEG" pixelformat             : 0x47504a4d [MJPG]    VIDIOC_G_FMT(VIDEO_CAPTURE) type                    : VIDEO_CAPTURE fmt.pix.width           : 1600 fmt.pix.height          : 1200 fmt.pix.pixelformat     : 0x47504a4d [MJPG] fmt.pix.field           : NONE fmt.pix.bytesperline    : 0 fmt.pix.sizeimage       : 5760000 fmt.pix.colorspace      : unknown fmt.pix.priv            : 0
so changed my settings to
It took a bit of trial and error

Next, I was receiving
Got unexpected memory map file size 49153524, expected 230401524
and this post helped me:
http://jared-oberhaus-tech-notes.blogspot.com.au/2011/12/im-trying-to-capture-video-from-device.html

Our old friend shmmax eh? Apparently I had about 32 mb set up (!) on my laptop, so I changed it to 671088640 (640 mb)
sudo sysctl -w kernel.shmmax=671088640

See this post for how to make it permanent.

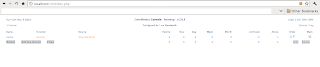
Anyway, once all is well you will hopefully see something like this (note the colours -- the /dev/ is a nice orange, although the log is still an unhappy red)
Now we can actually do things. Click on the name of your device (here: laptop) and you should get something like

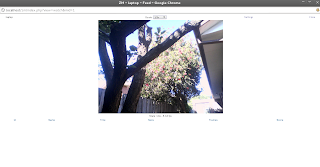
You can now click on Zones in the main menu and add one (takes a little bit of trial and error, but you'll get there). To get motion detection, and thus get ZM to save things, change the mode from Monitor to e.g. modec

Your files will  be found under /usr/share/zoneminder/events but you can change that using the setting menu which you can access in the top right corner in the main window.

So that's pretty much it. There are a couple of settings you might want to fiddle with:
You might want to set up ffmpeg to allow for generation of video fles


So I got fed up with one of my cameras not working together with zoneminder. As a temporary fix I set zoneminder to use 'file' instead of 'local' or 'remote'. So now zoneminder looks at ~/webcam/current.jpg.
In that directory, a script is running (you need to install streamer):

#!/bin/bashwhile truedo streamer -c /dev/video0 -b 24 -s 640x480 -o current.jpeg -q 2> /dev/null        sleep 1done

Also, I created a directory and symmlinked it to /usr/share/events to prevent my root partition from filling up:
mkdir zm/chown www-data zm/sudo rm /usr/share/zoneminder/events -rfsudo ln -s /home/me/webcam/zm /usr/share/zoneminder/events

279. Formatting and adding a disk with fdisk

To contact us Click HERE
I've got a box with two harddrives -- sda (160 gb) has debian and sdb has CentOS (500 gb). I never use CentOS and I need the space for debian.

sudo fdisk -l
WARNING: GPT (GUID Partition Table) detected on '/dev/sda'! The util fdisk doesn't support GPT. Use GNU Parted.Disk /dev/sda: 160.0 GB, 160041885696 bytes255 heads, 63 sectors/track, 19457 cylinders, total 312581808 sectorsUnits = sectors of 1 * 512 = 512 bytesSector size (logical/physical): 512 bytes / 512 bytesI/O size (minimum/optimal): 512 bytes / 512 bytesDisk identifier: 0x00000000 Device Boot Start End Blocks Id System/dev/sda1 1 312581807 156290903+ ee GPTDisk /dev/sdb: 500.1 GB, 500107862016 bytes255 heads, 63 sectors/track, 60801 cylinders, total 976773168 sectorsUnits = sectors of 1 * 512 = 512 bytesSector size (logical/physical): 512 bytes / 512 bytesI/O size (minimum/optimal): 512 bytes / 512 bytesDisk identifier: 0x0007e385 Device Boot Start End Blocks Id System/dev/sdb1 * 63 32772599 16386268+ 83 Linux/dev/sdb2 32772600 40965749 4096575 83 Linux/dev/sdb3 40965750 43006004 1020127+ 82 Linux swap / Solaris/dev/sdb4 43006005 976768064 466881030 5 Extended/dev/sdb5 43006068 976768064 466880998+ 83 Linux

We're in 'luck' since we're only interested in killing sdb, and gparted wants a Display (this is done remotely).
So
sudo fdisk /dev/sdb
Command (m for help): dPartition number (1-5): 1Command (m for help): d Partition number (1-5): 2Command (m for help): dPartition number (1-5): 3Command (m for help): dPartition number (1-5): 4Command (m for help): wThe partition table has been altered!Calling ioctl() to re-read partition table.Syncing disks.

So did it work?
 sudo fdisk -l
WARNING: GPT (GUID Partition Table) detected on '/dev/sda'! The util fdisk doesn't support GPT. Use GNU Parted.Disk /dev/sda: 160.0 GB, 160041885696 bytes255 heads, 63 sectors/track, 19457 cylinders, total 312581808 sectorsUnits = sectors of 1 * 512 = 512 bytesSector size (logical/physical): 512 bytes / 512 bytesI/O size (minimum/optimal): 512 bytes / 512 bytesDisk identifier: 0x00000000 Device Boot Start End Blocks Id System/dev/sda1 1 312581807 156290903+ ee GPTDisk /dev/sdb: 500.1 GB, 500107862016 bytes255 heads, 63 sectors/track, 60801 cylinders, total 976773168 sectorsUnits = sectors of 1 * 512 = 512 bytesSector size (logical/physical): 512 bytes / 512 bytesI/O size (minimum/optimal): 512 bytes / 512 bytesDisk identifier: 0x0007e385 Device Boot Start End Blocks Id System
Time to create a new partition
sudo fdisk /dev/sdb
Command (m for help): nPartition type: p primary (0 primary, 0 extended, 4 free) e extendedSelect (default p): pPartition number (1-4, default 1): Using default value 1First sector (2048-976773167, default 2048): Using default value 2048Last sector, +sectors or +size{K,M,G} (2048-976773167, default 976773167): Using default value 976773167Command (m for help): wThe partition table has been altered!Calling ioctl() to re-read partition table.Syncing disks.

Did it work?
sudo fdisk -l /dev/sdb
Disk /dev/sdb: 500.1 GB, 500107862016 bytes81 heads, 63 sectors/track, 191411 cylinders, total 976773168 sectorsUnits = sectors of 1 * 512 = 512 bytesSector size (logical/physical): 512 bytes / 512 bytesI/O size (minimum/optimal): 512 bytes / 512 bytesDisk identifier: 0x0007e385 Device Boot Start End Blocks Id System/dev/sdb1 2048 976773167 488385560 83 Linux
Create a file system:
sudo mkfs.ext4 /dev/sdb1
mke2fs 1.42.5 (29-Jul-2012)Filesystem label=OS type: LinuxBlock size=4096 (log=2)Fragment size=4096 (log=2)Stride=0 blocks, Stripe width=0 blocks30531584 inodes, 122096390 blocks6104819 blocks (5.00%) reserved for the super userFirst data block=0Maximum filesystem blocks=42949672963727 block groups32768 blocks per group, 32768 fragments per group8192 inodes per groupSuperblock backups stored on blocks: 32768, 98304, 163840, 229376, 294912, 819200, 884736, 1605632, 2654208, 4096000, 7962624, 11239424, 20480000, 23887872, 71663616, 78675968, 102400000Allocating group tables: done Writing inode tables: done Creating journal (32768 blocks): doneWriting superblocks and filesystem accounting information: done
Let's automount it:
mkdir /home/me/scratch

and edit /etc/fstab
/dev/sdb1  /home/me/scratch    ext4    defaults        0       2

You're done.

280. gOpenMol on Debian Wheezy

To contact us Click HERE
This is a quick description of how to install gOpenMol (software for visualising output from various comp. chem. packages) on debian:

wget http://www.csc.fi/english/pages/g0penMol/Downloads/gopenmol-3.00-linux.tar.gz
gopenmol-3.00-linux.tar.gz
tar xvf gopenmol-3.00-linux.tar.gz
sudo mv gOpenMol-3.00 /opt/
/opt/gOpenMol-3.00/./install
echo 'export PATH=$PATH:/opt/gOpenMol-3.00/bin' >> ~/.bashrc
source ~/.bashrc
rungOpenMol

I'm having issues with a transparent background in the main window on my nvidia box. Not sure what it's like  on other machines.

281. Visualising NWChem output with GabEdit

To contact us Click HERE
I've never liked Gabedit much (looks a bit dated, tries to do 'too much') -- until today. Suddenly I have a newfound respect for the developer(s) behind it. It actually doesn't try to do 'too much' -- it simply does A LOT, and does it in a pretty transparent way.

Long story short -- you can do things with gabedit which you can't do (easily) with ECCE, and as such it has become an important ally. Besides, it's always nice to have alternatives.

GabEdit is in the Debian repos.

Running your calculations
There are some restrictions"
1. NOTE: you must run your nwchem job with explicit basis sets (i.e. entered as text) -- to do that in ECCE tick the box as shown in the figure below. If you're running 'pure' nwchem, you (probably) have to cut and paste from the basis set directory -- see e.g. section 7.2 here. It's a minor convenience for gaining access to what GabEdit has to offer.


2. You can only open Single point/Energy calculations i.e. Optimizations won't work. So do a single point calculation on your optimized structure.

3. Also, you need to rename/copy your output file so that it ends with .out.
gabedit won't read it otherwise

GabEdit
It's fairly straightforward -- just point and click. One thing which you will want to play with are the iso-surface settings. The defaults are rarely good.

Anyway, I'll let the screenshots do the talking:

Go straight to the Output viewer -- Geometry/Orbital/Density
Click on the M, or right-click anywhere in the window, and load your renamed nwchem output file.


Here's triplet oxygen. The alpha, beta orbitals are listed in the right window

You can do electron localisation

Look at spin density (the unpaired electrons are in the anti-bonding  pi orbitals)

Contour plots are neat -- here showing spin density

Electrostatic potential. 


There's a lot to explore. GabEdit can obviously also prepare and submit jobs, but I'm happy with ECCE in this respect, and content with using GabEdit for post-processing.

Ektron eWebEditPro5: Run time Error '0'

To contact us Click HERE
Hi Friends,

If you recently moved to any Siebel Maintenance fix packs 8.0.0.6 and above then you might face an annoying issue with Siebel HTML Editor a.k.a Ektron eWebEditPro Editor!

After you apply the fix pack for Siebel Web Server Extension (SWSE), it upgrades the existing eWebEditPro editor from v4 to v5.

After this upgrade a necessary configuration change is not mentioned in the Maintenance Configuration Section, due to which you will notice that any template tried to be opened in the new HTML Editor results into a blank load & if you right click in the editor it results into a error popup window titled eWebEditProLibCtl5 saying, "Run time error '0'"


 In order to resolve this, you will need to edit the webeditorctrl.htm file under /$SIEBEL_SWSE_ROOT/public/enu/webeditor/

Find out the below code:


and replace it with below code:


After you do this, make sure you do a CLEAR CACHE in your browser else it will still show Javascript errors like:


This happens as the old webeditorctrl.htm file is used from browser cache for loading eWebEditPro Editor.
So ensure you do a clear cache without fail!

Hope this helps resolve patching issue.

Keywords:
siebel crm,siebel customer relationship management,siebel solutions,siebel support,siebel supportweb,siebel systems, SWSE, eWebEditPro, Ektron, HTML Editor, Marketing, WYSIWYG HTML Editor, WYSIWYG, etc.Related Posts : Javascript,SBAv8.0Troubleshooting

2 Ocak 2013 Çarşamba

282. Mesa 9.0.1 (64 bit) on debian wheezy

To contact us Click HERE

This post is intended as a step towards building wine with libOSmesa. Apparently any version of libOSmesa lower than 9 is no good, and debian wheezy currently have version 8.

Unfortunately building the 32 bit version turns out to be more complex than just requesting it via --enable-32-bit, so I'll be making a post on a chrooted build of the missing wine libraries later. I've also noticed that libOSMesa is just a small part of Mesa -- this build overlaps a lot with mesa-common-dev as well.

Finally, I don't really have a good grasp over graphics on linux -- which means that I'm still confused by OpenGl, CL, Mesa etc.

As usual: I have a lot of packages installed on my standard compile node, so there are probably a lot of packages which are needed which I didn't notice. But here we go:


First you need to build e.g. libdrm 2.4.40 since wheezy and sid currently have v2.4.33 and you need 2.4.39 or newer.

sudo apt-get install libpciaccess-dev checkinstallwget http://cgit.freedesktop.org/mesa/drm/snapshot/libdrm-2.4.40.tar.gztar xvf libdrm-2.4.40.tar.gzcd libdrm-2.4.40/./autogen makesudo checkinstall

When you're asked for a description, type 'libdrm 2.4.40' and it should get the version number right.
(you could also build with --prefix and install it somewhere else but that makes things trickier later)

Make sure it installed correctly:
aptitude show libdrmPackage: libdrm                          New: yesState: installedAutomatically installed: noVersion: 2.4.40-1Priority: extraSection: checkinstallMaintainer: root@berylliumArchitecture: amd64Uncompressed Size: 733 kDescription: libdrm 2.4.40


Build OS mesa v.9.0.1.

sudo apt-get install flex bison libdrm-dev xutils-dev x11proto-gl-dev x11proto-dri2-dev libx11-xcb-dev libxcb-glx0-dev libxcb-dri2-0-dev libxcb-xfixes0-dev llvmcd ~/tmpwget ftp://ftp.freedesktop.org/pub/mesa/9.0.1/MesaLib-9.0.1.tar.gztar xvf MesaLib-9.0.1.tar.gzcd Mesa-9.0.1/./autogen.sh --enable-osmesamakesudo checkinstall
This package will be built according to these values: 0 -  Maintainer: [ root@beryllium ]1 -  Summary: [ Mesa 9.0.1 64 bit]2 -  Name:    [ mesa ]3 -  Version: [ 9.0.1 ]4 -  Release: [ 1 ]5 -  License: [ GPL ]6 -  Group:   [ checkinstall ]7 -  Architecture: [ amd64 ]8 -  Source location: [ Mesa-9.0.1 ]9 -  Alternate source location: [  ]10 - Requires: [  ]11 - Provides: [ mesa ]12 - Conflicts: [  ]13 - Replaces: [  ]
Some notes:
xutils-dev contains makedepend; x11proto-gl-dev is GLPROTO, x11proto-dri2-dev is DRI2PROTO
LLVM is needed for one step in the build process (gallium). I'm sure you can get around it, but I'm not too bothered.


283. gnome-shell-extension-common 3.0.2 and gnome-shell-extensions 3.4.0 conflict

To contact us Click HERE
Not sure how this came about but I might have downloaded and install an unsupported .deb (from here I think) at some point at the beginning of Gnome 3.
Following this post will get you back to a conflict-free system BUT it will also remove debs that depend on gnome-shell-extension-common (i.e. packages that you have have downloaded from the web as deb packages. It won't affect normal gnome shell extensions).

The problem:
Unpacking gnome-shell-extensions (from .../gnome-shell-extensions_3.4.0-2_all.deb) ...dpkg: error processing /var/cache/apt/archives/gnome-shell-extensions_3.4.0-2_all.deb (--unpack): trying to overwrite '/usr/share/locale/fr/LC_MESSAGES/gnome-shell-extensions.mo', which is also in package gnome-shell-extension-common 3.0.2-2Errors were encountered while processing: /var/cache/apt/archives/gnome-shell-extensions_3.4.0-2_all.debE: Sub-process /usr/bin/dpkg returned an error code (1)
and
sudo apt-get remove gnome-shell-extension-common Reading package lists... DoneBuilding dependency tree       Reading state information... DoneYou might want to run 'apt-get -f install' to correct these:The following packages have unmet dependencies: gnome : Depends: gnome-shell-extensions (>= 3.4) but it is not going to be installed gnome-shell-extension-alternate-tab : Depends: gnome-shell-extension-common but it is not going to be installed gnome-shell-extension-alternative-status-menu : Depends: gnome-shell-extension-common but it is not going to be installed gnome-shell-extension-auto-move-windows : Depends: gnome-shell-extension-common but it is not going to be installed gnome-shell-extension-dock : Depends: gnome-shell-extension-common but it is not going to be installed gnome-shell-extension-gajim : Depends: gnome-shell-extension-common but it is not going to be installed gnome-shell-extension-user-theme : Depends: gnome-shell-extension-common but it is not going to be installed gnome-shell-extension-windows-navigator : Depends: gnome-shell-extension-common but it is not going to be installed gnome-shell-extension-xrandr-indicator : Depends: gnome-shell-extension-common but it is not going to be installedE: Unmet dependencies. Try 'apt-get -f install' with no packages (or specify a solution).

The solution:
sudo dpkg --force-overwrite -i /var/cache/apt/archives/gnome-shell-extensions_3.4.0-2_all.debsudo apt-get install -fsudo apt-get autoremove gnome-shell-extension-common=3.0.2-1sudo apt-get update && sudo apt-get upgrade

284. Fix for: nautilus-open-terminal opens in $HOME

To contact us Click HERE
Update: due to a change in the exec-arg, if you followed the instruction here you now can't open the terminal (using nautilus) at all if you've upgraded to nautilus 3.4.2. Look at this post to fixing it: http://verahill.blogspot.com.au/2012/12/another-nautilus-open-terminal-related.html
Everything should now work perfectly.

Original post:
This has been bothering me for the past week or so:if I use nautilus-open-terminal (i.e. right-click in nautilus and select open in terminal) it now always opens in $HOME instead of in the directory I want it to open in.

 Apparently I'm not the only one: http://bugs.debian.org/cgi-bin/bugreport.cgi?bug=692518

Luckily the solution is quick and simple: run this in your terminal, then open a new nautilus window:

gsettings set org.gnome.desktop.default-applications.terminal exec gnome-terminal

302. Surfraw on debian (and goosh)

To contact us Click HERE
I like shells, so I was pretty chuffed to discover this: http://goosh.org
This is basically a google shell simulator running in a gui browser -- not a true shell in any respect, so while it's really neat, but not terribly useful in itself. See below for how to get it set up.

It got me looking for true command line alternatives though, such as surfraw. While it was originally started by Julian Assange in 2000 it has been maintained by others during the past ten years.

Regardless, surfraw really does bring the power of the command line and the web together in a useful way.

To get set up with surfraw, do
sudo apt-get install surfrawsr wikipedia surfraw

which opens a new window in your default browser -- e.g. chromium if that's what you have. This means that while you shoot of your command in the terminal, you'll then have to switch to your desktop environment. To force surfraw to use a more sensible alternative, e.g. w3m, install w3m and then create ~/.surfraw.conf and put
SURFRAW_text_browser=w3mSURFRAW_text_browser_args=-dumpSURFRAW_graphical=no
in it. The -dump allows you to grep through the output but makes the whole experience less interactive -- remove that line to make things open properly in w3m instead.

w3m takes a bit of getting used to, so a cheat sheet might help: http://wiki.titan2x.com/index.php?title=W3m_cheat_sheet

A lot of it makes sense if you're used to vim though.

The next step is to explore what modules (elvi) are available e.g.
sr -elvi
acronym -- Look for acronyms definitions (www.acronymfinder.com)ask -- Question the web using Ask Jeeves (www.ask.com)bbcnews -- Search BBC News (news.bbc.co.uk)bing -- Search the web using Microsoft's Bing (www.bing.com)currency -- Convert currencies with the Universal Currency Converter (www.xe.net/ucc)debbugs -- Search the debian BTS (bugs.debian.org)duckduckgo -- Securely search the web using duckduckgo (www.duckduckgo.com)google -- Search the web using Google (www.google.com)pgpkeys -- Search the PGP key databasescholar -- Search Google Scholar (scholar.google.com)wikipedia -- Search the free encyclopedia wikipediayoutube -- Search YouTube (www.youtube.com)

Hours of fun to be had:
sr wikipedia surfraw|lesssr google -results=100 -q "nwchem cosmo"|grep verahill

etc. It's probably not going to change your life, but time will tell whether there's an advantage of using surfraw over just (e)links or w3m.


Goosh
There's an unofficial script which will help you install it. If you haven't got $EDITOR set, you can do export EDITOR=/usr/bin/vim or export EDITOR=/usr/bin/nano first. For some reason the value set using update-alternatives --config editor doesn't translate into $EDITOR. The editor is needed to edit the config file during installation.
cd ~/tmpwget "https://raw.github.com/tolecnal/goosh-installer/master/goosh.sh"chmod +x goosh.sh./goosh.shsudo mkdir /var/www/gooshsudo cp $HOME/goosh/index.php /var/www/goosh

and open http://localhost/goosh in your browser. This offers  basically no advantage over just navigating to http://goosh.org

Ektron eWebEditPro5: Run time Error '0'

To contact us Click HERE
Hi Friends,

If you recently moved to any Siebel Maintenance fix packs 8.0.0.6 and above then you might face an annoying issue with Siebel HTML Editor a.k.a Ektron eWebEditPro Editor!

After you apply the fix pack for Siebel Web Server Extension (SWSE), it upgrades the existing eWebEditPro editor from v4 to v5.

After this upgrade a necessary configuration change is not mentioned in the Maintenance Configuration Section, due to which you will notice that any template tried to be opened in the new HTML Editor results into a blank load & if you right click in the editor it results into a error popup window titled eWebEditProLibCtl5 saying, "Run time error '0'"


 In order to resolve this, you will need to edit the webeditorctrl.htm file under /$SIEBEL_SWSE_ROOT/public/enu/webeditor/

Find out the below code:


and replace it with below code:


After you do this, make sure you do a CLEAR CACHE in your browser else it will still show Javascript errors like:


This happens as the old webeditorctrl.htm file is used from browser cache for loading eWebEditPro Editor.
So ensure you do a clear cache without fail!

Hope this helps resolve patching issue.

Keywords:
siebel crm,siebel customer relationship management,siebel solutions,siebel support,siebel supportweb,siebel systems, SWSE, eWebEditPro, Ektron, HTML Editor, Marketing, WYSIWYG HTML Editor, WYSIWYG, etc.Related Posts : Javascript,SBAv8.0Troubleshooting

1 Ocak 2013 Salı

285. Minor bug in ECCE

To contact us Click HERE
I'll classify this as a bug, since the specificity of it surely must mean that it is an unintended behaviour. Basically you lose your hand-edited changes in your input files if you're not careful.

By Editor I don't mean the vim editor, but rather then Job Editor in Ecce.

 A demonstation: 

1. Create an input in ECCE. In this case I created a single-point energy calculation of dioxygen. Hand-edit the input file by clicking on Final Edit and add e.g. maxiter 99 in the dft block.


 2. Run the job


 3. Open the Editor. With the Editor open, click on Run Mgmt/Reset for restart. (In spite of the figure below, it has nothing to do with whether the vim editor is open or not.)

 4. Your hand-edited changes are now gone.


 In contrast, if the Editor is not open when you click on Run Mgmt/Reset for restart the changes will be kept.

286. Briefly: installing the dev.carbon-project.org wine 1.5.5 from debs

To contact us Click HERE
Update: Try this first: http://verahill.blogspot.com.au/2012/11/compiling-wine-155-from-source-using.html
It uses a lot less bandwidth, and involves compiling wine yourself, but using the build instructions from the carbon-project.org

Please Note
For bandwidth reasons please don't use this method if you are satisfied with the version you obtain through compiling by following this method: http://verahill.blogspot.com.au/2012/10/wine-1515-on-debian-testingwheezy.html


A long time ago (http://verahill.blogspot.com.au/2012/01/debian-testingwheezy-64-bit-installing.html) I posted three methods for installing Wine on Debian Testing:
1. Use the Squeeze version
2. Get the Wine-unstable build from http://dev.carbon-project.org/debian/wine-unstable/
3. Compile your own version

I've never managed to build Wine to successfully include OpenCL, gstreamer, or libgsm. Also, there are occasional issues with libjpeg, and I recently have problems with libOSMesa.

So here's an alternative solution for installing a relatively recent version of wine, and it involves no compiling.

Note that it seems that the Wine project uses the traditional way of numbering releases i.e. odd version are development versions i.e. the 1.4 series is stable, the 1.5 series is under development, and the 1.6 series will be the next stable.

Please note what it says on the carbon-dev page:
The amount of traffic this little sub-page generates is quite respectable. If you think this service helpful and want to help cover some of the attached costs, please donate a few Euros, either through PayPal, by flattring this or by donating through Flattr. Thank you! (You can, of course, also donate something, for totally different reasons.)
So at the very least don't download the same packages over and over and keep bandwidth to a minimum.

Anyway, here we go.

0. Clean up
Uninstall any newer version of wine if you've compiled e.g. 1.5.15.
sudo apt-get autoremove wine

1. Download
Get the debs for wine 1.5.5:
cd ~/tmpmkdir wine-1.5.5cd wine-1.5.5/wget -r -l1 --no-parent -A amd64.deb http://dev.carbon-project.org/debian/wine-unstable/
FINISHED --2012-11-28 17:05:04--Total wall clock time: 1m 1sDownloaded: 18 files, 65M in 54s (1.20 MB/s)
cd dev.carbon-project.org/debian/wine-unstable/

2. Install
sudo dpkg -i *.deb
Processing triggers for man-db ...Setting up libwine-alsa-unstable (1.5.5-0.1) ...Setting up libwine-bin-unstable (1.5.5-0.1) ...Setting up libwine-capi-unstable (1.5.5-0.1) ...Setting up libwine-cms-unstable (1.5.5-0.1) ...Setting up libwine-dbg-unstable (1.5.5-0.1) ...Setting up libwine-dev-unstable (1.5.5-0.1) ...Setting up libwine-gl-unstable (1.5.5-0.1) ...Setting up libwine-gphoto2-unstable (1.5.5-0.1) ...Setting up libwine-ldap-unstable (1.5.5-0.1) ...Setting up libwine-openal-unstable (1.5.5-0.1) ...Setting up libwine-oss-unstable (1.5.5-0.1) ...Setting up libwine-print-unstable (1.5.5-0.1) ...Setting up libwine-sane-unstable (1.5.5-0.1) ...Setting up wine-bin-unstable (1.5.5-0.1) ...Processing triggers for mime-support ...Processing triggers for gnome-menus ...Processing triggers for desktop-file-utils ...Setting up wine-unstable (1.5.5-0.1) ...

3. You're done

287. Compiling Wine 1.5.5 from source using the carbon-dev deb patches

To contact us Click HERE
Here's how to build the wine 1.5.5 packages without any errors.

I'm cheating and using the debian rules from dev.carbon-project.org.-- it's a small file and is a better solution than downloading the deb files from there.

Note that you will probably need more packages than the ones listed here.

1. Download the source and debian build patches
cd ~/tmpmkdir wine-1.5.5_carbon/cd wine-1.5.5_carbon/wget http://sourceforge.net/projects/wine/files/Source/wine-1.5.5.tar.bz2mv wine-1.5.5.tar.bz2 wine-unstable_1.5.5.orig.tar.bz2tar xvf wine-unstable_1.5.5.orig.tar.bz2cd wine-1.5.5/wget http://dev.carbon-project.org/debian/wine-unstable/wine-unstable_1.5.5-0.1.debian.tar.bz2tar xvf wine-unstable_1.5.5-0.1.debian.tar.bz2

2.  Edit control, control.in and rules
Allow any version of gcc (this may obviously backfire if your version is no good)
Editdebian/control and control.in

 27  gcc-4.5-multilib [amd64 kfreebsd-amd64], gcc-4.5 [amd64 kfreebsd-amd64] 28  g++-4.5 [amd64 kfreebsd-amd64],

so that is says
 27  gcc-multilib [amd64 kfreebsd-amd64], gcc [amd64 kfreebsd-amd64], 28  g++ [amd64 kfreebsd-amd64],

Edit debian/rules
 53 ifeq ($(DEB_HOST_GNU_CPU),x86_64) 54 CC=gcc-4.5 55 CXX=g++-4.5 56 else 57 CC=gcc 58 CXX=g++

to say
 53 ifeq ($(DEB_HOST_GNU_CPU),x86_64) 54 CC=gcc 55 CXX=g++ 56 else 57 CC=gcc 58 CXX=g++

2. Get dependencies
sudo apt-get install ia32-libs ia32-libs-dev bison flex gcc libc6-dev libfontconfig-dev libfreetype6-dev libglu-dev libgsm1-dev libice-dev libjpeg-dev libldap-dev libmpg123-dev libncurses5-dev libopenal-dev libpng-dev libsm-dev libssl-dev libusb-dev libx11-dev libxcomposite-dev libxcursor-dev libxext-dev libxi-dev libxinerama-dev libxml2-dev libxrandr-dev libxrender-dev libxslt-dev libxt-dev libxxf86vm-dev make libcapi20-dev liblcms-dev libsane-dev libhal-dev libdbus-1-dev valgrind prelink libcups2-dev opencl-dev lib32opencl1 oss4-dev gettext lib32v4l-dev lib32ncurses5-dev lib32asound2-dev libtiff4-dev libgphoto2-2-devsudo apt-get install libxkbfile-dev libxxf86dga-dev freeglut3-dev unixodbc-dev gcc-multilib

3. Compile
in wine-1.5.5/:
dpkg-buildpackage -us -uc
If all went well you saw:
dpkg-deb: building package `wine-unstable' in `../wine-unstable_1.5.5-0.1_amd64.deb'.dpkg-deb: building package `wine-bin-unstable' in `../wine-bin-unstable_1.5.5-0.1_amd64.deb'.dpkg-deb: building package `libwine-dbg-unstable' in `../libwine-dbg-unstable_1.5.5-0.1_amd64.deb'.dpkg-deb: building package `libwine-dev-unstable' in `../libwine-dev-unstable_1.5.5-0.1_amd64.deb'.dpkg-deb: building package `libwine-unstable' in `../libwine-unstable_1.5.5-0.1_amd64.deb'.dpkg-deb: building package `libwine-alsa-unstable' in `../libwine-alsa-unstable_1.5.5-0.1_amd64.deb'.dpkg-deb: building package `libwine-bin-unstable' in `../libwine-bin-unstable_1.5.5-0.1_amd64.deb'.dpkg-deb: building package `libwine-capi-unstable' in `../libwine-capi-unstable_1.5.5-0.1_amd64.deb'.dpkg-deb: building package `libwine-cms-unstable' in `../libwine-cms-unstable_1.5.5-0.1_amd64.deb'.dpkg-deb: building package `libwine-gl-unstable' in `../libwine-gl-unstable_1.5.5-0.1_amd64.deb'.dpkg-deb: building package `libwine-gphoto2-unstable' in `../libwine-gphoto2-unstable_1.5.5-0.1_amd64.deb'.dpkg-deb: building package `libwine-ldap-unstable' in `../libwine-ldap-unstable_1.5.5-0.1_amd64.deb'.dpkg-deb: building package `libwine-openal-unstable' in `../libwine-openal-unstable_1.5.5-0.1_amd64.deb'.dpkg-deb: building package `libwine-oss-unstable' in `../libwine-oss-unstable_1.5.5-0.1_amd64.deb'.dpkg-deb: building package `libwine-print-unstable' in `../libwine-print-unstable_1.5.5-0.1_amd64.deb'.dpkg-deb: building package `libwine-sane-unstable' in `../libwine-sane-unstable_1.5.5-0.1_amd64.deb'.[..]dpkg-source: info: using options from wine-1.5.5/debian/source/options: --compression=bzip2 --compression-level=9dpkg-source: info: unapplying Bug#28201_proposed-fix-modified.patchdpkg-source: info: unapplying Bug#28898_squashed-proposed-patches.patchdpkg-source: info: unapplying fix-winegcc-paths.patchdpkg-source: info: unapplying Bug#29669_proposed-fix.patchdpkg-source: info: unapplying function_grep.patchdpkg-source: info: unapplying readd_xpm.patchdpkg-source: info: unapplying debian-changes-from-1.1.32-1.patchdpkg-buildpackage: full upload (original source is included)

Your packages will be found in the wine-1.5.5_carbon/ directory.
../libwine-alsa-unstable_1.5.5-0.1_amd64.deb../libwine-bin-unstable_1.5.5-0.1_amd64.deb../libwine-capi-unstable_1.5.5-0.1_amd64.deb../libwine-cms-unstable_1.5.5-0.1_amd64.deb../libwine-dbg-unstable_1.5.5-0.1_amd64.deb../libwine-dev-unstable_1.5.5-0.1_amd64.deb../libwine-gl-unstable_1.5.5-0.1_amd64.deb../libwine-gphoto2-unstable_1.5.5-0.1_amd64.deb../libwine-ldap-unstable_1.5.5-0.1_amd64.deb../libwine-openal-unstable_1.5.5-0.1_amd64.deb../libwine-oss-unstable_1.5.5-0.1_amd64.deb../libwine-print-unstable_1.5.5-0.1_amd64.deb../libwine-sane-unstable_1.5.5-0.1_amd64.deb../libwine-unstable_1.5.5-0.1_amd64.deb../wine-bin-unstable_1.5.5-0.1_amd64.deb../wine-unstable_1.5.5-0.1_amd64.deb

If something went wrong, it's probably because of a missing dependency.

To install just run
sudo dpkg -i *.deb in the wine-1.5.5_carbon/ directory.

288. KStar (Australia) 1500 VA UPS on Debian Wheezy with NUT

To contact us Click HERE
NOTE: long day and not quite familiar with this yet, so haven't proof-read this post. Your mileage may vary.

Being fed up with the recent frequency of power-outages in our department building I headed off to MSY and picked up a UPS, the KStar BM3150 1500 VA (link). Oddly enough this seems to be an Antipodean-only UPS, as the main Kstar website doesn't list it.

The UPS comes with a USB port, and if you connect it to a computer you'll find that the UPS is recognised as a Lakeview Research product:

lsusb
Bus 001 Device 002: ID 8087:0024 Intel Corp. Integrated Rate Matching HubBus 002 Device 002: ID 8087:0024 Intel Corp. Integrated Rate Matching HubBus 001 Device 001: ID 1d6b:0002 Linux Foundation 2.0 root hubBus 002 Device 001: ID 1d6b:0002 Linux Foundation 2.0 root hubBus 001 Device 003: ID 0925:1234 Lakeview Research Bus 002 Device 003: ID 0b95:7720 ASIX Electronics Corp. AX88772Bus 002 Device 004: ID 05e3:0606 Genesys Logic, Inc. USB 2.0 Hub / D-Link DUB-H4 USB 2.0 HubBus 002 Device 005: ID 04d9:1603 Holtek Semiconductor, Inc. KeyboardBus 002 Device 006: ID 0461:4d81 Primax Electronics, Ltd
dmesg
[ 424.292130] usb 1-1.3: new low-speed USB device number 3 using ehci_hcd[ 424.389739] usb 1-1.3: New USB device found, idVendor=0925, idProduct=1234[ 424.390648] usb 1-1.3: New USB device strings: Mfr=1, Product=2, SerialNumber=0[ 424.391553] usb 1-1.3: Product: UPS USB MON V1.4[ 424.392449] usb 1-1.3: Manufacturer: \xffffffd0\xffffff89\xffffff89[ 424.397491] hid-generic 0003:0925:1234.0004: hiddev0,hidraw3: USB HID v1.00 Device [\xffffffd0\xffffff89\xffffff89 UPS USB MON V1.4] on usb-0000:00:1a.0-1.3/input0
The UPS comes with a CD which contains a full-fledged Windows collection of software, and a pre-compiled shell-only 32 bit binary (need ia32-libs) which is installed via a shell script which needs modification to run properly on Debian. In other words -- it seems to have linux 'support' as a selling point, but not much more. It's so bad that it's not realistically useful.

Googling 0925:124 leads to this post: http://ifireball.wordpress.com/2011/10/13/configuring-aviem-pro2100-ups-on-debian-6-0-stablesqueeze/

The solution below is not particularly elegant -- I compile nut from source to get the udev rules and the richcomm driver, then install the debian nut packages.

cd ~/tmpsudo apt-get install libusb-dev
wget http://www.networkupstools.org/source/2.6/nut-2.6.4.tar.gztar xvf nut-2.6.4.tar.gzcd nut-2.6.4/./configure --with-usb --with-dev
Configuration summary:======================build serial drivers: yes build USB drivers: yes build SNMP drivers: no build neon based XML driver: no enable Avahi support: no build Powerman PDU client driver: no build IPMI driver: no enable SSL development code: yes enable libwrap (tcp-wrappers) support: no enable libltdl (Libtool dlopen abstraction) support: yes build CGI programs: no enable HAL support: no build and install documentation: no build and install the development files: yes
makesudo make install

Things are installed, but in an non-standard place.
/usr/local/ups/bin/nut-scanner
Scanning USB bus.No start IP, skipping NUT bus (old connect method)[nutdev1] driver = "richcomm_usb" port = "auto" vendorid = "0925" productid = "1234" bus = "001"
sudo ln -s /lib/udev/rules.d/52-nut-usbups.rules /etc/udev/rules.d/52-nut-usbups.rulessudo service udev restartsudo apt-get install nut nut-cgi
Edit /ect/nut/ups.conf
[kstar]driver=richcomm_usbport=autodesc='kstar'
Edit /etc/nut/nut.conf
MODE=standalone
Edit /etc/nut/upsmon.conf
MONITOR kstar@localhost 1 upsmon myups master
Edit /etc/nut/upsd.conf
[upsmon]password=myupsupsmon master
Then restart the nut server
sudo service nut-server restartps aux|grep nut
nut 3594 0.0 0.0 16764 592 ? Ss 18:00 0:00 /lib/nut/richcomm_usb -a kstarnut 7179 0.0 0.0 16764 592 ? Ss 18:29 0:00 /lib/nut/richcomm_usb -a kstarnut 7182 0.0 0.0 16900 568 ? Ss 18:29 0:00 /sbin/upsd
upsc kstar
device.mfr: Richcomm dry-contact to USB solutiondevice.model: UPS USB MON V1.4device.serial: unknowndevice.type: upsdriver.name: richcomm_usbdriver.parameter.pollinterval: 2driver.parameter.port: autodriver.version: 2.6.4driver.version.internal: 0.04ups.mfr: Richcomm dry-contact to USB solutionups.model: UPS USB MON V1.4ups.productid: 1234ups.serial: unknownups.status: OLups.vendorid: 0925

Errors:
I'm leaving the various errors here more or less as link-bait. I tried using the NUT in the debian repos, and it gave me nothing than pain.

It's not nicely formatted or anything. Basically, if you see any of the crap below, compile your own version.
./configure --with-drivers=richcomm_usb --with-statepath=/var/run/nut --with-pidpath=/var/run/nut --with-user=nut --with-group=nut
Configuration summary:======================build serial drivers: yes build USB drivers: yes build SNMP drivers: no build neon based XML driver: no enable Avahi support: no build Powerman PDU client driver: no build IPMI driver: no build Mac OS X meta-driver: no enable SSL development code: yes enable libwrap (tcp-wrappers) support: no enable libltdl (Libtool dlopen abstraction) support: yes build nut-scanner: yesbuild CGI programs: no enable HAL support: no build and install documentation: no build and install the development files: no only build specific drivers: richcomm_usb
makesudo make install

Now try to load the driver:
sudo upsdrvctl -u root -D start
Network UPS Tools - UPS driver controller 2.6.4 0.000000 Starting UPS: kstarNetwork UPS Tools - Richcomm dry-contact to USB driver 0.04 (2.6.4)Warning: This is an experimental driver.Some features may not function correctly.
and it didn't really work. Checking dmesg
[282263.171108] usb 1-1.3: usbfs: interface 0 claimed by usbhid while 'richcomm_usb' sets config #1

and looking at
ls /sys/bus/usb/drivers/usb/1-1.3/ -lah
lrwxrwxrwx 1 root root 0 Dec 1 10:09 driver -> ../../../../../../bus/usb/drivers/usb
means that the device already has a driver loaded, so
sudo suecho -n "1-1.3" > /sys/bus/usb/drivers/usb/unbindexitls /sys/bus/usb/drivers/usb/1-1.3/ -lah
ls: cannot access /sys/bus/usb/drivers/usb/1-1.3/: No such file or directory
sudo upsdrvctl -u root -D start
Network UPS Tools - UPS driver controller 2.6.4 0.000000 Starting UPS: kstarNetwork UPS Tools - Richcomm dry-contact to USB driver 0.04 (2.6.4)Warning: This is an experimental driver.Some features may not function correctly.Communications with UPS lost: Query to UPS failed
dmesg
[284116.758107] usb 1-1.3: usbfs: interface 0 claimed by usbfs while 'richcomm_usb' sets config #1[..][284155.661271] usb 1-1.3: usbfs: interface 0 claimed by usbfs while 'richcomm_usb' sets config #1[284155.790409] usb 1-1.3: usbfs: process 17105 (richcomm_usb) did not claim interface 0 before use
sigh...
ls /sys/bus/usb/drivers/usbfs/ -lah
lrwxrwxrwx 1 root root 0 Dec 4 17:07 1-1.3:1.0 -> ../../../../devices/pci0000:00/0000:00:1a.0/usb1/1-1/1-1.3/1-1.3:1.0
sudo suecho -n "1-1.3:1.0" > /sys/bus/usb/drivers/usbfs/unbindexit
Then try again
  sudo upsdrvctl -u root -D start
Network UPS Tools - UPS driver controller 2.6.4 0.000000 Starting UPS: kstarNetwork UPS Tools - Richcomm dry-contact to USB driver 0.04 (2.6.4)Warning: This is an experimental driver.Some features may not function correctly.Duplicate driver instance detected! Terminating other driver!Communications with UPS lost: Query to UPS failed
So I then did
sudo vim /etc/udev/rules.d/70-ignore-ups.rules
ATTRS{idVendor}=="0925", ATTRS{idProduct}=="1234", OPTIONS=="ignore_device"
sudo service udev restart
Stopping the hotplug events dispatcher: udevd.Starting the hotplug events dispatcher: udevd.
If you get this:
 sudo upsdrvctl -D start
Network UPS Tools - UPS driver controller 2.6.4 0.000000 Starting UPS: kstarNetwork UPS Tools - Richcomm dry-contact to USB driver 0.04 (2.6.4)Warning: This is an experimental driver.Some features may not function correctly.USB device [0925:1234] matches, but driver callback failed: could not detach kernel driver from interface 0: Operation not permitted 0.004077 Driver failed to start (exit status=1)
then you need to make sure to add -u root to upsdrvctl. Also, make sure that the driver versions match.

Ektron eWebEditPro5: Run time Error '0'

To contact us Click HERE
Hi Friends,

If you recently moved to any Siebel Maintenance fix packs 8.0.0.6 and above then you might face an annoying issue with Siebel HTML Editor a.k.a Ektron eWebEditPro Editor!

After you apply the fix pack for Siebel Web Server Extension (SWSE), it upgrades the existing eWebEditPro editor from v4 to v5.

After this upgrade a necessary configuration change is not mentioned in the Maintenance Configuration Section, due to which you will notice that any template tried to be opened in the new HTML Editor results into a blank load & if you right click in the editor it results into a error popup window titled eWebEditProLibCtl5 saying, "Run time error '0'"


 In order to resolve this, you will need to edit the webeditorctrl.htm file under /$SIEBEL_SWSE_ROOT/public/enu/webeditor/

Find out the below code:


and replace it with below code:


After you do this, make sure you do a CLEAR CACHE in your browser else it will still show Javascript errors like:


This happens as the old webeditorctrl.htm file is used from browser cache for loading eWebEditPro Editor.
So ensure you do a clear cache without fail!

Hope this helps resolve patching issue.

Keywords:
siebel crm,siebel customer relationship management,siebel solutions,siebel support,siebel supportweb,siebel systems, SWSE, eWebEditPro, Ektron, HTML Editor, Marketing, WYSIWYG HTML Editor, WYSIWYG, etc.Related Posts : Javascript,SBAv8.0Troubleshooting